Steve Bennett blogs

…about maps, open data, Git, and other tech.

Category Archives: Tools

Your own personal National Map with TerriaJS: no coding and nothing to deploy

National Map is a pretty awesome place to find geospatial open data from all levels of Australian government.  (Disclaimer: I work on it at NICTA). But thanks to some not-so-obvious features in TerriaJS, the software that drives it, you can actually create and share your own private version with your own map layers – without programming, and without deploying any code.

What you get:

  • A 3D, rotateable, zoomable globe, thanks the awesome Cesium library. (It seamlessly falls back to Leaflet if 3D isn’t available.)
  • Selectable layers, grouped into an organised hierarchy of your devising
  • Support for a wide range of spatial services: WMS, WFS, ESRI (both catalogs and individual layers for all of these), CKAN, individual files like GeoJSON and KML, and even CSV files representing regions like LGAs, Postcodes, States…
  • Choose your own basemap, initial camera position, styling for some spatial types, etc.

1. Make your own content with online tools

Want to create your own spatial layer – polygons, lines and points? Use geojson.io and choose Save > Gist to save the result to Github Gist. (Gist is just a convenient service that stores text on the web for free).

Screenshot 2015-07-02 07.56.52

How about a layer of data about suburbs by postcode? Create a Google Sheet that follows the csv-au-geo specification (it’s easy!), download as CSV, paste it into a fresh Gist.

Screenshot 2015-07-02 08.02.28

2. Create a catalog with the Data Source Editor

Using the new TerriaJS Data Source Editor (I made this!), create your new catalog. You’re basically writing a JSON file but using a web form (thanks json-editor!) to do it.

To add one of your datasources on Gist, make sure you link to the Raw view of the page:

Screenshot 2015-07-02 08.07.02

Screenshot 2015-07-02 08.08.16

Don’t forget to select the type for each file: GeoJSON, CSV, etc.

3. Add more data

You might want to bring in some other data sources that you found on National Map. This can be a little tricky – there’s a lot of complexity in accessing data sources that National Map hides for you.

But here’s roughly how to go about it for a WMS (web map service) data source.

In the layer’s info window, grab the WMS URL

Screenshot 2015-07-02 10.53.13

You’ll need to put “http://nationalmap.gov.au/proxy/” in front of a some layers, because their WMS servers don’t support CORS.

You’ll also need the value of the “Layer name” field. (For Esri layers you need to dig a bit further.)

Screenshot 2015-11-13 11.10.55

(Yes, this layer is called “2”)

Add a WMS layer, and add “Layers Names” as an additional property. So it looks like this:

Screenshot 2015-07-02 10.55.54

4. Tweak your presentation

You can add extra properties to layers to fine tune their appearance. For example, for our CSV dataset:

Screenshot 2015-07-02 10.57.49

You might want to set “Is Enabled” and “Is Shown” on every layer so they display automatically.

And finally, you might want to set an initial camera and base map, so the view doesn’t start off the west coast of Africa with a satellite view.

Screenshot 2015-07-02 10.39.55

5. Save and preview

Screenshot 2015-07-02 10.46.41

As you make changes, click “Save to Gist” to save your configuration file to a secret location on Gist. You can then click “Preview your changes in National Map”.

Screenshot 2015-07-02 11.01.19

Make a note of the Gist link so you can keep working on it in the future. You can’t modify an existing configuration, but you can load from there and save a new copy.

6. Share!

Now you have a long URL like this: http://nationalmap.research.nicta.com/#clean&https%3A%2F%2Fgist.githubusercontent.com%2Fanonymous%2Fc3f181ca742b9ed94fe4%2Fraw%2F10853f7d8bb33610e4f2ce26947eaf6882192957%2Fdatasource.json

So, use tinyurl.com or another URL shortening service to get something more useful:

http://tinyurl.com/myawsummap

Normalize cross-tabs for Tableau: a free Google Sheets tool

Problem

You want to do some visualisation magic in Tableau, but your spreadsheet looks like this:

All those green columns are dependent variables: independent observations about one location defined by the white columns.

Tableau would be so much happier if your spreadsheet looked like this:

This is called “normalizing” the “cross-tab” format, or converting from “wide format” to “long format”, or “UNPIVOT“. Tableau provides an Excel plugin for reshaping data. Unfortunately, if you don’t use Excel, you’re stuck. It’s kind of weird.

Solution

Anyway, I’ve made a Google Sheets script “Normalize cross-tab” that will do it for you.

As the instructions say, to use it, you:

  1. Reorganise your data so that all the independent variable columns are to the right of all the dependent ones; then
  2. Place the cursor somewhere in the first (leftmost) independent variable column.

It then creates a new sheet, “NormalizedResult”, and puts the result there.

How to use

It’s surprisingly clumsy to share Google Scripts, at least until the new “Add-ons” feature is mature. Here’s the best I can do for you:

1. Copy the script to the clipboard

Go to https://raw.githubusercontent.com/stevage/normalize-crosstab/master/normalizeCrossTab.gs, select all the text, and copy to the clipboard.

2. Upload your spreadsheet to Google Sheets

Upload your Excel spreadsheet into Google Sheets, if it’s not there already.

3. Tools > Script Editor…

4. Click “Spreadsheet”


5. Paste

In the window labelled “Code.gs”, select all the text and paste over it the script from the clipboard.

6. Save.

You need to give this script “project” a name. It doesn’t matter.

7. Select the “start” function.

8. Click Run

Click Continue and accept the authorisation request.

9. Follow the instructions of the script

Now, switch windows to your Google Sheet, and you’ll see the sidebar.

10. Download your normalised spreadsheet

On the NormalizedResult page, choose File > Download as…

Screenshot 2015-01-06 20.53.36


If you want to convert several spreadsheets, you can save yourself pain by loading them all into the same workbook. Just remember that the script will always save its output to NormalizedOutput.

Chromecast in the real world: six casting workflows

For such a simple device, Google’s Chromecast has created a surprisingly complex network of technology at my place.

Google says that Chromecast works roughly like this:

Chromecast Google view

Actually it’s more complicated than that. My setup is about as simple as you can get (no NAS, no existing media servers, no Netflix or Hulu or Foxtel or anything), and it looks like this:


Chromecast in the real world

Chromecast in the real world. Not so simple, really.


Six casting workflows

That is, depending on what exactly I want to watch and how, I have to choose between 6 different workflows:

  1. YouTube? Just go to the YouTube website in Chrome, and click the Chromecast button in the video window. This works really well. Great for music playlists, too.
  2. iView or SBS? Go to the site, and use the Google Cast extension to “TabCast”. This works so-so. It’s great for randomly showing something funny you found on the web, though.
  3. Movies you’ve downloaded? Use the VideoStream Chrome app to load it directly off disk. This works perfectly.
  4. Movies in your Plex library? Use the Plex web interface. For some reason you have to go through http://plex.tv, and the whole experience is a bit complicated. There are some issues with transcoding that I don’t really understand.
  5. Vimeo? Plex to the rescue. Add Vimeo as a channel (a slightly complicated procedure to view your own uploads).
  6. Want to watch something without using your computer? There’s only a couple of “Google Cast ready Android apps” (YouTube is the only one that works well for me), or use BubbleUPnP to access your Plex library.

And I haven’t even mentioned a couple more complications:

My advice? Figure out the smallest number of workflows to do everything you want to do, and get rid of any extraneous apps, servers, websites etc.

Google’s world

Google’s world centres around casting stuff from your phone. If that was all you could do, the Chromecast would suck. There are few apps, a lot of them are very niche (eg, anime or baseball), junk (like this) or just don’t really work (like the Red Bull app, which drops out every few minutes).

Fortunately, third party tools like VideoStream and Plex fill in a lot of the gaps.

But does it work?

The end result is actually great. Compared to having to plug my laptop into the TV, these things are now easy and fun:

  • Put on some background music: go to YouTube, Pandora or GrooveShark, and cast. No more hooking up audio cables.
  • Show a silly video to my partner. Even from the other room. Stuff I previously wouldn’t have bothered with, but it’s so easy – the TV even turns on by itself.
  • Keep watching a video while doing something else. Easy to leave my study, keep watching the same thing while making coffee or something.
  • Show photos: Just go to Google Plus or Flickr, and cast.

Git: what they didn’t tell you

Credit:Tim Strater from Rotterdam, Nederland CC-BY-SA

Of all the well-documented difficulties I’ve had working with Git over the years, a few conceptual difficulties really stand out. They’re quirks in the Git architecture that took me far too long to realise, far too long to believe, or far too long to really grasp. And maybe you have the same problem without realising it.

Branch names are completely arbitrary


git branch -d master
git checkout develop -b master

There, I did it. I’m now calling the develop branch master. What you call this branch, and what I call it, and what your Github repo calls it, and what my Github repo calls it just don’t matter. Four different names? No problem. There are some flimsy conventions that Git half-heartedly follows to link two branches with the same name, but it gives up pretty easily.

Remote branches are local

I have very frequently fallen into this trap:

$ git diff origin/master
$

No differences, so my branch must be in sync with Origin, right? Wrong. What is true is my branch is in sync with the local copy of Origin. If you don’t run git fetch, then Git will never even update its local copies.

Technically, Git has always been upfront about this. The Git book opens the section on remote branches:

Remote branches are references to the state of branches on your remote repositories.

But it’s counterintuitive, and so I keep messing it up. I keep hoping (and assuming) that Git will one day include an auto-fetch option, where it constantly synchronises remote branches

‘Detached HEAD’ mode is fine

Here’s the message that we have seen many times:

Note: checking out ‘origin/develop’.

You are in ‘detached HEAD’ state. You can look around, make experimental
changes and commit them, and you can discard any commits you make in this
state without impacting any branches by performing another checkout.

If you want to create a new branch to retain commits you create, you may
do so (now or later) by using -b with the checkout command again. Example:

git checkout -b new_branch_name

This scary looking message threw me off for a long time, despite the fact that it’s actually one of Git’s most helpful messages – it tells you everything you need to know.

It boils down to this: you can’t make a commit if you’re not at the top of a branch. The two most common situations that cause this are:

    1. Checking out a remote branch. You should do this:

      git checkout origin/develop -b mydevelop
      or even, if you want to abandon your branch completely:
      git branch -d develop
      git checkout origin/develop -b develop
  1. Checking out a commit in the middle of a branch, like:

    git checkout a8e6b18

    Usually in this case you just want to look at it, so you can just ignore the message.

There’s nothing special about ‘git clone’

For a long time, I thought that ‘git init’, ‘git pull’ and ‘git clone’ somehow created repositories that were different, even if they ended up with the same commits in them. It’s hard to recreate my state of mind, but I spent a long time trying to salvage certain directories on disk when I should have just abandoned them.

Similarly, there is no difference between:

  1. git clone http://github.com/stevage/myrepo
  2. git init
    git remote add origin http://github.com/stevage/myrepo
    git pull origin master

Well, in the second case Git’s a bit confused about which local branches map onto which remote branches, so you have to be more explicit or fix it with some configuration option.

Don’t call any remote ‘origin’

Credit: Chevassu (GFDL)

For some reason, Git encourages you to call the source of the first clone “origin”. I have found this very confusing and ultimately very unhelpful. Let’s say you’re working on a project called widget, and you fork it in Github so you can work on it. You will want both remotes accessible locally, so you will probably do one of these:

  1. git clone http://github.com/stevage/widget
    git remote add widget http://github.com/widget/widget
  2. git clone http://github.com/widget/widget
    git remote add mine http://github.com/stevage/widget

So you either have remotes called “origin” and “widget”, or remotes called “origin” and “mine”. But on the next project, you might make the opposite choice, and soon you really don’t remember what “origin” means.

My tip: never name any remote “origin” ever. Name them all after their Github username.

  1. git init
    git remote add widget http://github.com/widget/widget
    git remote add stevage http://github.com/stevage/widget
    git fetch --all
    get checkout stevage -b master

You will never understand “git reset”‘s options

The difference between “git reset”, “git reset –soft” and “git reset –hard” is beyond your comprehension. And you probably wanted “git checkout” anyway.

Rule of thumb:

  • If your directory is FUBAR: git reset –hard
  • If you just want to throw away changes to one file: git checkout file
  • In all other cases, google it.

Trello Tennis

(Credit: Flickr’s Carine06, CC-BY-SA)

Here’s my method of keeping track of stuff to do. Other tools just didn’t work for me. Most to-do list tools make two assumptions, I think:

  1. Work arrives from somewhere (eg, a manager), and is readily broken up into pieces roughly 0.5-4 hours in size.
  2. Your primary responsibility is processing these tasks without gaps, maintaining a high level of output.

My work, technology for academics, tends to involve  coordinating lots of little projects with lots of different people. At any given moment, there are few tasks “in my court”, and they tend to be small. My primary responsibility is to keep all projects moving, and ensure that projects aren’t held up by a task being with me too long.

So, I ran with the ball in my court / ball in your court metaphor. It’s useful when:

  1. Your work is primarily about projects, and particularly a relationship between you and the main stakeholder in that project.
  2. You anxiously wonder whether you’re supposed to be doing something on a project.
  3. You have trouble remembering all the relevant bits of information for each project.

“Projects” here can be very small, and often include very early stage proposals that haven’t formed into anything very concrete.

Presenting: Trello Tennis.

Trello Tennis in (fictious) action

Trello Tennis in (fictious) action

To start with, the two most important columns:

  • Ball in my court: projects whose current state requires me to do something (as small as writing an email or checking something, or as big as preparing a whole workshop structure)
  • Ball in their court: projects whose current state is waiting for someone else to do something, such as providing feedback on a document, organising an event, or replying to an email.

The goal each day is to move projects from the “my court” column to the “their court” column. I periodically review “my court”, placing the most urgent items at the top. I also review “their court”, checking whether I should follow up or offer assistance.

More columns, that turned out to be useful for me:

  • All good/meeting scheduled: projects whose current state is that both parties are waiting for an event, usually a meeting. Neither of us has to do anything until then.
  • Wut?: the most dangerous column, projects where I’m not sure what the current state is after all. Am I waiting on them? Did I promise to research something and get back to them?
  • Somebody else’s problem (SEP): where responsibility for the project has been shifted to someone else. I don’t need to do anything, and I don’t even need to monitor it at the moment. Someone else may eventually hand it back to me, but until then I don’t worry.
  • Archive: the project is actually finished.
  • Blocked: there is a technical reason why the project can’t advance, and no one is currently doing anything about it.

Using Trello

Trello works really well for this.

The name of each card consists of both the project name, and a quick summary of my current task (if in my court), or what I’m waiting on if in theirs. Examples:

  • WidgetUpgrade – check if compatible with Ubuntu Precise
  • FoobarSystem – Anita fixing DNS problem
  • Maps for Psych – meeting Thurs 3rd 2pm

What’s particularly fantastic about using Trello is that each card can also track all the work on that project. Changing the title automatically creates a history trace, or I can add comments to record more information. Need somewhere to record a server name and login details? Use the card’s description field.

You can also use coloured labels to group projects, such as tagging by university in my case.

Of course, each individual project frequently has its own task tracking system: perhaps another Trello board, Github issues, Pivotal Tracker, Google spreadsheets etc. I link to them from the card’s description, ultimately tying together all information systems for all projects under a single roof.

The rules

Each day (or whenever):

  1. If there is anything in “Wut?”, attempt to clarify its state, then move it to the right column.
  2. Check each item in “Ball in their court” to see if it needs attention. Set alarms if you need. If it’s time to follow up, just move it back to “Ball in my court” and adjust the title.
  3. Review the “Ball in my court” list, ordering them appropriately – most urgent at the top.
  4. Work through items in “Ball in my court” if you have any free time. :)

To make this natural, I order the columns from left to right as follows: Wut, My Court, Blocked, Their Court, All Good, SEP, Archive. Stress is on the left, calm is on the right.

The goal is to get your board to look like this blissful fantasy:

A totally successful day in Trello Tennis land.

A totally successful day in Trello Tennis land.

These examples are actually tiny compared to (my) reality. By the end of 2013, I had 21 active cards, plus another 10 inactive (SEP and Archive). If you find this technique at all useful, or have any improvements, I’d love to hear about it.

Filtering for sanity

(Added 4 Feb 2014)
Sometimes it gets daunting looking at the huge mounds of work in front of you. Filtering can help cut through the distraction. Two types have worked for me:

Filter by organisation

Filter by client

Are you working for a particular client today, and don’t want to see anything related to any other clients? Assign one label per client, then turn on the filter!

Filter by … you

Filter by youTo focus on just one or two tasks that you need to finish, first assign yourself to those cards. Then, filter to only show cards that you’re assigned to. This feature is intended for collaboration, but it works nicely.

Anonymous longitudinal surveys with LimeSurvey

A researcher at the Australian Research Centre in Sex, Health and Society (ARCSHS, pronounced “archers”) carries out surveys that are both:

  • anonymous: personal details are not collected, and steps are taken to avoid being able to identify participants; and
  • longitudinal: participants are contacted at intervals to answer similar questions. Questions often refer to previous answers given by the participant.

It’s a tricky combination, not well supported by most survey software. Here’s a solution, using LimeSurvey, that doesn’t require modifying any code. These instructions are aimed at people with no familiarity with LimeSurvey.

Quick summary:

  1. The survey is carried out in not anonymous mode. Anonymity is maintained through an external email redirection service.
  2. Additional attributes are added on to token tables for follow-up rounds.
  3. Answers from each survey are transferred to the additional attributes through Excel manipulation

Survey hosting

LimeService is a very cheap way to host LimeSurvey, and removes the burden of server administration.

Anonymous email addresses

Participants must not sign up for the survey using their actual email address. Instead, they should go to a third-party email forwarding site like http://notsharingmy.info. For the participant:

  1. Click on a link
  2. Enter their email address, click “Get an obscure email”
  3. Copy the generated email address into the survey registration form.

(Note: as of January 2013, notsharingmy.info is unreliable. I’m working on another solution.)

About tokens

This solution relies heavily on LimeSurvey’s “tokens” which are explained badly in the interface. Enabling tokens just means you want to track information about individual participants: individual adding them to the list, inviting them, keeping track of who completed the survey or who needs another reminder. We also add “additional attributes”: the participants’ previous answers.

1. Set up the initial survey

  1. Create a new survey:  Image
  2. Fill out the Description, Welcome Message, End Message.
  3. Create the first question group.
  4. Create some questions.
  5. Set these survey “general settings”:
    1. Tokens > Allow public registration? Yes
    2. (Optional) Modify the registration text as described below in “Avoiding personal information”
  6. Activate the survey. You’ll be asked if you want to initialise tokens:
    Image
    Yes, you do.
  7. Publicise the URL, and get lots of responses. Great.

Avoiding personal information

By default, LimeSurvey collects from each self-registering participant their first name, last name and email address. For a truly anonymous survey, you may wish to avoid collecting their name.

  1. Under Global Settings, choose Template Editor:
    Screen shot 2013-01-21 at 4.27.42 PM
  2. As the warning points out, editing the default template isn’t a great idea. Let’s make a copy called “no_name_collecting”:
    Screen shot 2013-01-21 at 4.28.47 PM
  3. Now, edit the copy. Select “startpage.pstpl”, then add  this code just before the “</head”> line:
    ...
    <script>
    $(function(){
    $("[name=register_firstname]").parent().parent().hide()
    $("[name=register_lastname]").parent().parent().hide()
    });
    </script>
    </head>

    Screen shot 2013-01-21 at 4.31.05 PM


  4. Next, you might want to change the registration message, to direct people to create an anonymous email address. On the “Register” screen,Screen shot 2013-01-21 at 4.36.16 PM
    select “register.pstpl”.
  5. In the code, replace {REGISTERMESSAGE1} and {REGISTERMESSAGE2} with any text or HTML you like.Screen shot 2013-01-21 at 4.38.41 PM

2. Export responses and tokens

  1. Export the responses as CSV
    Image

    Image
  2. Export the tokens as CSV:
    Image
    Image

3. Create follow-up survey

The first survey was a success, and there are now lots of entries in the tokens table and the responses table. More in the former than the latter, because some people will sign up and not answer any questions.

  1. Copy the first survey. (Click the + button, like starting a new survey first.)
    Image
  2. You’ll probably want to remove some irrelevant questions and groups, so do that.
  3. Now add one “additional attribute” for every response that you want to refer to from the initial survey. In Token Management:
    Screen shot 2013-01-21 at 2.07.54 PMScreen shot 2013-01-21 at 2.17.35 PMThe other fields don’t matter. Leave them blank.
  4. Next, you may want to use these attributes in some questions. Let’s say you want to ask “Last time you did this survey you were 42. How old are you now?”
    Screen shot 2013-01-21 at 4.07.11 PMIn the question text, click ‘LimeSurvey replacement field properties’ then select the extended attribute:Screen shot 2013-01-21 at 4.08.29 PMThe text then looks like this:
    Screen shot 2013-01-21 at 4.09.57 PM
  5. You can get fancy and set that value as the default for the question. Instructions on how to do this.
  6. Repeat this for each question, wherever those extended attributes are needed.

4. Transfer previous responses to the follow-up survey

  1. Download the token table for this survey. It will have no data, but the headers will be useful.So far, you have created a way to hold answers from previous surveys for each participant. But you haven’t actually put those answers in there. Time for some Excel magic. You want to create a token table for the follow-up survey, using bits from the three CSV files you’ve dowloaded so far.:
    1. Tokens table for initial survey. (Containing the email addresses people signed up with.)
    2. Responses for initial survey.
    3. Tokens table for follow-up survey (containing the additional attributes).
  2. Copy all the rows of tokens from the initial survey to the follow-up survey. Don’t copy the header row:Screen shot 2013-01-21 at 3.08.29 PMMake sure you retain the additional attribute fields (attribute_1 etc.) They should be blank.
  3. Notice that these tokens have already been “completed”. Clear out the invited and completed fields. Set the remindercount field to 0 and usesleft field to 1:
    Screen shot 2013-01-21 at 3.10.19 PM
  4. Now, copy columns from the participant responses table into attribute fields, one by one, as appropriate. Make sure the IDs line up correctly.Screen shot 2013-01-21 at 3.11.42 PM
  5. Save the file (“followup-tokens.csv” if you like). Now import it into your follow-up survey.Screen shot 2013-01-21 at 3.13.37 PMScreen shot 2013-01-21 at 3.16.11 PM

5. Activate the follow-up survey

Whew. You’re now ready to launch.

  1. Activate the survey.
  2. Send out invitations. Under “Token control”:Screen shot 2013-01-21 at 4.44.58 PM
  3. The default email template is pretty gross, so clean it up a bit before you send:Screen shot 2013-01-21 at 4.47.13 PM
  4. Each participant receives a custom URL which logs them in without requiring any username and password.

You can then repeat this process for each subsequent iteration.

10 things I hate about Git

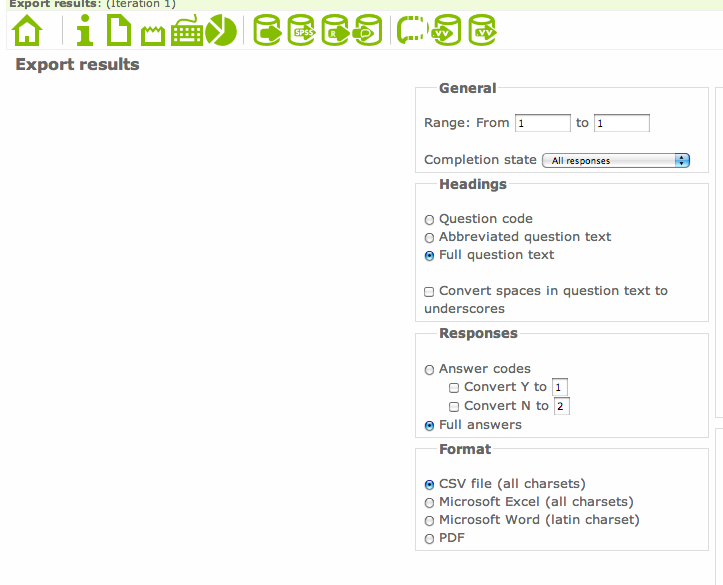
Git is the source code version control system that is rapidly becoming the standard for open source projects. It has a powerful distributed model which allows advanced users to do tricky things with branches, and rewriting history. What a pity that it’s so hard to learn, has such an unpleasant command line interface, and treats its users with such utter contempt.

1. Complex information model

The information model is complicated – and you need to know all of it. As a point of reference, consider Subversion: you have files, a working directory, a repository, versions, branches, and tags. That’s pretty much everything you need to know. In fact, branches are tags, and files you already know about, so you really need to learn three new things. Versions are linear, with the odd merge. Now Git: you have files, a working tree, an index, a local repository, a remote repository, remotes (pointers to remote repositories), commits, treeishes (pointers to commits), branches, a stash… and you need to know all of it.

2. Crazy command line syntax

The command line syntax is completely arbitrary and inconsistent. Some “shortcuts” are graced with top level commands: “git pull” is exactly equivalent to “git fetch” followed by “git merge”. But the shortcut for “git branch” combined with “git checkout”? “git checkout -b”. Specifying filenames completely changes the semantics of some commands (“git commit” ignores local, unstaged changes in foo.txt; “git commit foo.txt” doesn’t). The various options of “git reset” do completely different things.

The most spectacular example of this is the command “git am”, which as far as I can tell, is something Linus hacked up and forced into the main codebase to solve a problem he was having one night. It combines email reading with patch applying, and thus uses a different patch syntax (specifically, one with email headers at the top).

3. Crappy documentation

The man pages are one almighty “fuck you”. They describe the commands from the perspective of a computer scientist, not a user. Case in point:

git-push – Update remote refs along with associated objects

Here’s a description for humans: git-push – Upload changes from your local repository into a remote repository

Update, another example: (thanks cgd)

git-rebase – Forward-port local commits to the updated upstream head

Translation: git-rebase – Sequentially regenerate a series of commits so they can be applied directly to the head node

4. Information model sprawl

Remember the complicated information model in step 1? It keeps growing, like a cancer. Keep using Git, and more concepts will occasionally drop out of the sky: refs, tags, the reflog, fast-forward commits, detached head state (!), remote branches, tracking, namespaces

5. Leaky abstraction

Git doesn’t so much have a leaky abstraction as no abstraction. There is essentially no distinction between implementation detail and user interface. It’s understandable that an advanced user might need to know a little about how features are implemented, to grasp subtleties about various commands. But even beginners are quickly confronted with hideous internal details. In theory, there is the “plumbing” and “the porcelain” – but you’d better be a plumber to know how to work the porcelain.
A common response I get to complaints about Git’s command line complexity is that “you don’t need to use all those commands, you can use it like Subversion if that’s what you really want”. Rubbish. That’s like telling an old granny that the freeway isn’t scary, she can drive at 20kph in the left lane if she wants. Git doesn’t provide any useful subsets – every command soon requires another; even simple actions often require complex actions to undo or refine.
Here was the (well-intentioned!) advice from a GitHub maintainer of a project I’m working on (with apologies!):
  1. Find the merge base between your branch and master: ‘git merge-base master yourbranch’
  2. Assuming you’ve already committed your changes, rebased your commit onto the merge base, then create a new branch:
  3. git rebase –onto <basecommit> HEAD~1 HEAD
  4. git checkout -b my-new-branch
  5. Checkout your ruggedisation branch, and remove the commit you just rebased: ‘git reset –hard HEAD~1’
  6. Merge your new branch back into ruggedisation: ‘git merge my-new-branch’
  7. Checkout master (‘git checkout master’), merge your new branch in (‘git merge my-new-branch’), and check it works when merged, then remove the merge (‘git reset –hard HEAD~1’).
  8. Push your new branch (‘git push origin my-new-branch’) and log a pull request.
Translation: “It’s easy, Granny. Just rev to 6000, dump the clutch, and use wheel spin to get round the first corner. Up to third, then trail brake onto the freeway, late apexing but watch the marbles on the inside. Hard up to fifth, then handbrake turn to make the exit.”

6. Power for the maintainer, at the expense of the contributor

Most of the power of Git is aimed squarely at maintainers of codebases: people who have to merge contributions from a wide number of different sources, or who have to ensure a number of parallel development efforts result in a single, coherent, stable release. This is good. But the majority of Git users are not in this situation: they simply write code, often on a single branch for months at a time. Git is a 4 handle, dual boiler espresso machine – when all they need is instant.

Interestingly, I don’t think this trade-off is inherent in Git’s  design. It’s simply the result of ignoring the needs of normal users, and confusing architecture with interface. “Git is good” is true if speaking of architecture – but false of user interface. Someone could quite conceivably write an improved interface (easygit is a start) that hides unhelpful complexity such as the index and the local repository.

7. Unsafe version control

The fundamental promise of any version control system is this: “Once you put your precious source code in here, it’s safe. You can make any changes you like, and you can always get it back”. Git breaks this promise. Several ways a committer can irrevocably destroy the contents of a repository:

  1. git add . / … / git push -f origin master
  2. git push origin +master
  3. git rebase -i <some commit that has already been pushed and worked from> / git push

8. Burden of VCS maintainance pushed to contributors

In the traditional open source project, only one person had to deal with the complexities of branches and merges: the maintainer. Everyone else only had to update, commit, update, commit, update, commit… Git dumps the burden of  understanding complex version control on everyone – while making the maintainer’s job easier. Why would you do this to new contributors – those with nothing invested in the project, and every incentive to throw their hands up and leave?

9. Git history is a bunch of lies

The primary output of development work should be source code. Is a well-maintained history really such an important by-product? Most of the arguments for rebase, in particular, rely on aesthetic judgments about “messy merges” in the history, or “unreadable logs”. So rebase encourages you to lie in order to provide other developers with a “clean”, “uncluttered” history. Surely the correct solution is a better log output that can filter out these unwanted merges.

10. Simple tasks need so many commands

The point of working on an open source project is to make some changes, then share them with the world. In Subversion, this looks like:
  1. Make some changes
  2. svn commit

If your changes involve creating new files, there’s a tricky extra step:

  1. Make some changes
  2. svn add
  3. svn commit

For a Github-hosted project, the following is basically the bare minimum:

  1. Make some changes
  2. git add [not to be confused with svn add]
  3. git commit
  4. git push
  5. Your changes are still only halfway there. Now login to Github, find your commit, and issue a “pull request” so that someone downstream can merge it.

In reality though, the maintainer of that Github-hosted project will probably prefer your changes to be on feature branches. They’ll ask you to work like this:

  1. git checkout master [to make sure each new feature starts from the baseline]
  2. git checkout -b newfeature
  3. Make some changes
  4. git add [not to be confused with svn add]
  5. git commit
  6. git push
  7. Now login to Github, switch to your newfeature branch, and issue a “pull request” so that the maintainer can merge it.
So, to move your changes from your local directory to the actual project repository will be: add, commit, push, “click pull request”, pull, merge, push. (I think)

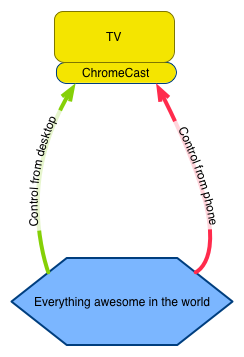
As an added bonus, here’s a diagram illustrating the commands a typical developer on a traditional Subversion project needed to know about to get their work done. This is the bread and butter of VCS: checking out a repository, committing changes, and getting updates.

“Bread and butter” commands and concepts needed to work with a remote Subversion repository.

And now here’s what you need to deal with for a typical Github-hosted project:

The “bread and butter” commands and concepts needed to work with a Github-hosted project.

If the power of Git is sophisticated branching and merging, then its weakness is the complexity of simple tasks.

Update (August 3, 2012)

This post has obviously struck a nerve, and gets a lot of traffic. Thought I’d address some of the most frequent comments.

  1. The comparison between a Subversion repository with commit access and a Git repository without it isn’t fair True. But that’s been my experience: most SVN repositories I’ve seen have many committers – it works better that way. Git (or at least Github) repositories tend not to: you’re expected to submit pull requests, even after you reach the “trusted” stage. Perhaps someone else would like to do a fairer apples-to-apples comparison.
  2. You’re just used to SVN There’s some truth to this, even though I haven’t done a huge amount of coding in SVN-based projects. Git’s commands and information model are still inherently difficult to learn, and the situation is not helped by using Subversion command names with different meanings (eg, “svn add” vs “git add”).
  3. But my life is so much better with Git, why are you against it? I’m not – I actually quite like the architecture and what it lets you do. You can be against a UI without being against the product.
  4. But you only need a few basic commands to get by. That hasn’t been my experience at all. You can just barely survive for a while with clone, add, commit, and checkout. But very soon you need rebase, push, pull, fetch , merge, status, log, and the annoyingly-commandless “pull request”. And before long, cherry-pick, reflog, etc etc…
  5. Use Mercurial instead! Sure, if you’re the lucky person who gets to choose the VCS used by your project.
  6. Subversion has even worse problems! Probably. This post is about Git’s deficiencies. Subversion’s own crappiness is no excuse.
  7. As a programmer, it’s worth investing time learning your tools. True, but beside the point. The point is, the tool is hard to learn and should be improved.
  8. If you can’t understand it, you must be dumb. True to an extent, but see the previous point.
  9. There’s a flaw in point X. You’re right. As of writing, over 80,000 people have viewed this post. Probably over 1000 have commented on it, on Reddit (530 comments), on Hacker News (250 comments), here (100 comments). All the many flaws, inaccuracies, mischaracterisations, generalisations and biases have been brought to light. If I’d known it would be so popular, I would have tried harder. Overall, the level of debate has actually been pretty good, so thank you all.

A few bonus command inconsistencies:

Reset/checkout

To reset one file in your working directory to its committed state:

git checkout file.txt

To reset every file in your working directory to its committed state:

git reset --hard

Remotes and branches

git checkout remotename/branchname
git pull remotename branchname

There’s another command where the separator is remotename:branchname, but I don’t recall right now.

Command options that are practically mandatory

And finally, a list of commands I’ve noticed which are almost useless without additional options.

Base command Useless functionality Useful command Useful functionality
git branch foo Creates a branch but does nothing with it git checkout -b foo Creates branch and switches to it
git remote Shows names of remotes git remote -v Shows names and URLs of remotes
git stash Stores modifications to tracked files, then rolls them back git stash -u Also does the same to untracked files
git branch Lists names of local branches git branch -rv Lists local and remote tracking branches; shows latest commit message
git rebase Destroy history blindfolded git rebase -i Lets you rewrite the upstream history of a branch, choosing which commits to keep, squash, or ditch.
git reset foo Unstages files git reset –hard
git reset –soft
Discards local modifications
Returns to another commit, but doesn’t touch working directory.
git add Nothing – prints warning git add .
git add -A
Stages all local modifications/additions
Stages all local modifications/additions/deletions

Update 2 (September 3, 2012)

A few interesting links: