Steve Bennett blogs

…about maps, open data, Git, and other tech.

Tag Archives: postgis

You might not need PostGIS: streamlined vector tile processing for big map visualisations

I recently re-engineered the data processing behind OpenTrees.org. It’s a website that lets you explore the combined open tree databases of 21 local councils around Australia (over 800,000!), with some pretty data visualisations. Working on this site has taught me a lot about processing data into vector tiles. Today’s lesson: “You might not need PostGIS”.

Screenshot 2018-05-15 11.19.19.png

Trees from Melbourne, Hobson’s Bay and Brimbank.

First version: Tilemill, PostGIS, PGRestAPI

The architecture of v1 looked like this: (See “OpenTrees.org: how to aggregate 373,000 trees from 9 open data sources“).

  • Configuration file in JSON stores the location of each source file.
  • Bash scripts using JQ (yes, really) to run wget, ogr2ogr and psql to fetch, convert and load each datafile into PostGIS.
  • SQL scripts to merge and clean the datasets together into a single schema.
  • Tilemill to generate raster tiles from the data.
  • PGRestAPI to provide a queryable interface to the data (particularly to allow the map to zoom to a particular tree by ID).
  • Nginx serving the front end, built with Mapbox.js (a wrapper around Leaflet).
  • The magic of UTFGrid allows interrogating individual tree points. (I still love this technology.)

It worked fairly well, but with the huge disadvantage of having to host a web-accessible server, complete with database.

Second version: Mapbox-GL-JS, vector tiles, static hosting

When I lost access to my free hosting, I re-architected it using Mapbox-GL-JS: v2.

  • Same scripts to fetch and process data into PostGIS.
  • More scripts which export data out of PostGIS and call Tippecanoe to generate vector tiles, which I then upload to Mapbox.com.
  • No Tilemill
  • Brand new front-end built using Mapbox-GL-JS, with some clever new data visualisation, such as visualising by “rarity”.
  • No PGRestAPI. Clicking on a tree updates the URL to include its lat/long, so you have a shareable link that will go to that tree.
  • Front end hosted on Github Pages.

Now we don’t need a server (Github Pages and Mapbox are serving everything we need, and are free). But we still have the heavy dependency of PostGIS.

Do we really need PostGIS?

What is PostGIS actually doing in this scenario? Mostly it’s doing very simple row-oriented, non-relational operations like:

Screenshot 2018-05-15 10.35.52.png

or:

Screenshot 2018-05-15 10.36.24.png

(Yes, I should have used SPLIT_PART())

And then finally we just dump the whole table out to disk.

I began trying to replace it with Spatialite, but that didn’t seem to play very nicely with NodeJS for me. As soon as it got fiddly, the benefits of using it over Postgres began to disappear.

And why did I even need it? Mostly because I already had scripts in SQL and just didn’t want to rewrite them.

So, the disadvantages of PostGIS here:

  • It’s a big, heavy dependency which discourages any other contributors.
  • The data processing scripts have to be in SQL, which introduces a second language (alongside Javascript).
  • No easy way to generate newline-delimited GeoJSON (which would make generating vector tiles a bit faster.)

Third version: NodeJS, Mapbox

So, I rewrote it as v3:

  • Replaced the Bash scripts with NodeJS. Which means, instead of the nonsense of JQ, we have sensible looking Javascript for which the JSON config files work well.
  • Instead of loading Shapefiles into PostGIS, I convert everything into GeoJSON.
  • Instead of SQL “merge” scripts, a NodeJS script processes each tree then writes them all out as a single, line-delimited GeoJSON file.
  • Tippecanoe then operates on that file to generate vector tiles, which I upload to Mapbox.
  • Split the repository in two: one for the data processing (“opentrees-data“), and a separate one for the front end (“opentrees“). This seems to be a good pattern.

The workflow now looks like:

  1. 1-gettrees.js uses a configuration file to fetch datasets from predefined locations and save them, in whatever formats, in a standard place.
  2. 2-loadtrees.js converts each of these files into a geojson file using OGR2OGR.
  3. 3-processFiles.js loads each of these, processing all the individual trees into a standard schema, then writes out a single combined line-delimited GeoJSON.
  4. 4-vectorTiles.sh uses Tippecanoe to generate an mbtiles from the GeoJSON.

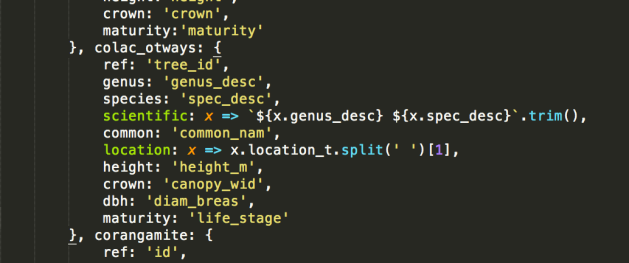
The processing scripts now look like:

Screenshot 2018-05-15 10.06.04.png

Screenshot 2018-05-15 10.07.11

For now, each GeoJSON file is loaded entirely in one synchronous load operation.

Screenshot 2018-05-15 10.41.32

(Processing all the GeoJSONs this way takes about 55 seconds on my machine. Loading them asynchronously reduces that to about 45. Most of the time is probably in the regular expressions.)

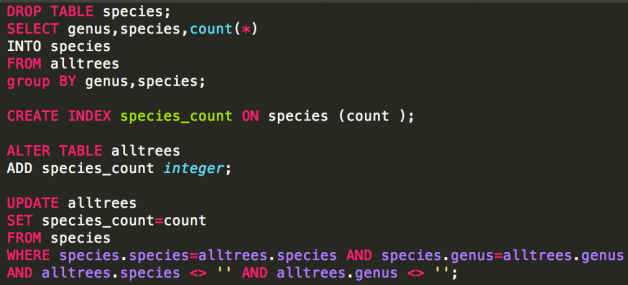
The only slight hurdle is generating the species count table. With PostGIS, this is just one more query run after all the others:

Screenshot 2018-05-15 10.23.15.png

In NodeJS, our “process each tree once” workflow can’t support this. After processing them once (counting species as we go), we process them all again to attach the species count attribute.

Screenshot 2018-05-15 10.19.27

If we were doing a lot of statistics, possibly PostGIS would start to look attractive again.

Do we really need OGR2OGR?

The next dependency I would like to remove is OGR2OGR. It is there because datasets arrive in formats I can’t control (primarily CSV, Shapefile, GeoJSON). I love using Mike Bostock’s shapefile library, but it doesn’t currently support projections other than EPSG:4326. That’s not a showstopper, just more work.

It would also be great not to have to maintain VRT files (in XML!) to describe the CSV formats in which data arrives.


Terrain in TileMill: a walkthrough for non-GIS types

I created a basemap for http://cycletour.org with TileMill and OpenStreetMap. It looked…ok.

Image

But it felt like there was something missing. Terrain. Elevation. Hills. Mountains. I’d put all that in the too hard basket, until a quick google turned up two blog posts from MapBox, the wonderful people who make TileMill. “Working with terrain data” and “Using TileMill’s raster-colorizer“. Putting these two together, plus a little OCD, led me to this:

Image

Slight improvement! Now, I felt that the two blog posts skipped a couple of little steps, and were slightly confusing on the difference between the two approaches, so here’s my step by step. (MapBox, please feel free to reuse any of this content.)

My setup is an 8 core Ubuntu VM with 32GB RAM and lots of disk space. I have OpenStreetMap loaded into PostGIS.

1. Install the development version of TileMill

You need to do this if you want to use the raster-colorizer. You want this while developing your terrain style, if you want the “snow up high, green valleys below” look. Without it, you have to pre-render the elevation color effect, which is time consuming. If you want to tweak anything (say, to move the snow line slightly), you need to re-render all the tiles.

Fortunately, it’s pretty easy.

  1. Get the “install-tilemill” gist (my version works slightly better)
  2. Probably uncomment the mapnik-from-source line (and comment out the other one). I don’t know whether you need the latest mapnik.
  3. Run it. Oh – it will uninstall your existing TileMill. Watch out for that.
  4. Reassemble stuff. The dev version puts projects in ~/Documents/<username/MapBox/project which is weird.

2. Get some terrain data.

The easiest place is the ubiquitous NASA SRTM DEM (digital elevation model) data. You get it from CGIAR. The user interface is awful. You can only download pieces that are 5 degrees by 5 degrees, so Victoria is 4 pieces.

Screen shot 2013-09-11 at 10.46.00 PM

If you’re downloading more than about that many, you’ll probably want to automate the process. I wrote this quick script to get all the bits for Australia:

for x in {59..67}; do
for y in {14..21}; do
echo $x,$y
if [ ! -f srtm_${x}_${y}.zip ]; then
wget http://droppr.org/srtm/v4.1/6_5x5_TIFs/srtm_${x}_${y}.zip
else
echo "Already got it."
fi
done
done
unzip '*.zip'


3. Process SRTM .tifs with GDAL.

To have any fun with terrain mapping in TileMill, you need to produce separate layers from the terrain data:

  1. The heightmap itself, so you can colour high elevations differently from low ones.
  2. A “hillshading” layer, where southeast facing slopes are dark, and northwest ones are light. This is what produces the “terrain” illusion.
  3. A “slopeshading” layer, where steep slopes (regardless of aspect) are dark. I’m ambivalent about how useful this is, but you’ll want to play with it.
  4. Contours. These can make your map look AMAZING.
Screen shot 2013-09-11 at 10.53.41 PM

Contours – they’re the best.

In addition, you’ll need some extra processing:

  1. Merge all the .tif’s into one. (I made the mistake of keeping them separate, which makes a lot of extra layers in TileMill). Because they’re GeoTiffs, GDAL can magically merge them without further instruction.
  2. Re-project it (converting it from some random ESPG to Google Web Mercator – can you tell I’m not a real GIS person?)
  3. A bit of scaling here and there.
  4. Generating .tif “overviews”, which are basically smaller versions of the tifs stored inside the same file, so that TileMill doesn’t explode.

Hopefully you already have GDAL installed. It probably came with the development version of TileMill.

Here’s my script for doing all the processing:

#!/bin/bash
echo -n "Merging files: "
gdal_merge.py srtm_*.tif -o srtm.tif
f=srtm
echo -n "Re-projecting: "
gdalwarp -s_srs EPSG:4326 -t_srs EPSG:3785 -r bilinear $f.tif $f-3785.tif

echo -n "Generating hill shading: "
gdaldem hillshade -z 5 $f-3785.tif $f-3785-hs.tif
echo and overviews:

gdaladdo -r average $f-3785-hs.tif 2 4 8 16 32
echo -n "Generating slope files: "
gdaldem slope $f-3785.tif $f-3785-slope.tif
echo -n "Translating to 0-90..."
gdal_translate -ot Byte -scale 0 90 $f-3785-slope.tif $f-3785-slope-scale.tif
echo "and overviews."
gdaladdo -r average $f-3785-slope-scale.tif 2 4 8 16 32
echo -n Translating DEM...
gdal_translate -ot Byte -scale -10 2000 $f-3785.tif $f-3785-scale.tif
echo and overviews.
gdaladdo -r average $f-3785-scale.tif 2 4 8 16 32
#echo Creating contours
gdal_contour -a elev -i 20 $f-3785.tif $f-3785-contour.shp

Take my word for it that the above script does everything I promise. The options I’ve chosen are all pretty standard, except that:

  • I’m exaggerating the hillshading by a factor of 5 vertically (“-z 5”). For no particularly good reason.
  • Contours are generated at 20m intervals (“-i 20”).
  • Terrain is scaled in the range -10 to 2000m. Probably an even lower lower bound would be better (you’d be surprised how much terrain is below sea levels – especially coal mines.) Excessively low terrain results in holes that can’t be styled and turn up white.

4. Load terrain layers into TileMill

Now you have four useful files, so create layers for them. I’d suggest creating them as layers in this order (as seen in TileMill):

  1. srtm-3785-contour.shp – the shapefile containing all the contours.
  2. srtm-3785-hs.tif – the hillshading file.
  3. srtm-3785-slope-scale.tif – the scaled slope shading file.
  4. srtm-3785.tif – the height map itself. (I also generate srtm-3785-scale.tif. The latter is scaled to a 0-255 range, while the former is in metres. I find metres makes more sense.)

For each of these, you must set the projection to 900913 (that’s how you spell GOOGLE in numbers). For the three ‘tifs’, set band=1 in the “advanced” box. I gather that GeoTiffs can have multiple bands of data, and this is the band where TileMill expects to find numeric data to apply colour to.

Screen shot 2013-09-11 at 11.06.39 PM

5. Style the layers

Mapbox’s blog posts go into detail about how to do this, so I’ll just copy/paste my styles. The key lessons here are:

  • Very slight differences in opacity when stacking terrain layers make a huge impact on the appearance of your map. Changing the colour of a road doesn’t make that much difference, but with raster data, a slight change can affect every single pixel.
  • There are lots of different raster-comp-ops to try out, but ‘multiply’ is a good default. (Remember, order matters).
  • Carefully work out each individual zoom level. It seems to work best to have hillshading transition to contours around zoom 12-13. The SRTM data isn’t detailed enough to really allow hillshading above zoom 13

My styles:

.hs[zoom <= 15] {
[zoom>=15] { raster-opacity: 0.1; }
[zoom>=13] { raster-opacity: 0.125; }
[zoom=12] { raster-opacity:0.15;}
[zoom<=11] { raster-opacity: 0.12; }
[zoom<=8] { raster-opacity: 0.3; }

raster-scaling:bilinear;
raster-comp-op:multiply;
}

// not really convinced about the value of slope shading
.slope[zoom <= 14][zoom >= 10] {
raster-opacity:0.1;
[zoom=14] { raster-opacity:0.05; }
[zoom=13] { raster-opacity:0.05; }
raster-scaling:lanczos;
raster-colorizer-default-mode: linear;
raster-colorizer-default-color: transparent;

// this combo is ok
raster-colorizer-stops:
stop(0, white)
stop(5, white)
stop(80, black);
raster-comp-op:color-burn;

}

// colour-graded elevation model
.dem {
[zoom >= 10] { raster-opacity: 0.2; }
[zoom = 9] { raster-opacity: 0.225; }
[zoom = 8] { raster-opacity: 0.25; }
[zoom <= 7] { raster-opacity: 0.3; }
raster-scaling:bilinear;
raster-colorizer-default-mode: linear;
raster-colorizer-default-color: hsl(60,50%,80%);
// hay, forest, rocks, snow

// if using the srtm-3785-scale.tif file, these stops should be in the range 0-255.
raster-colorizer-stops:
stop(0,hsl(60,50%,80%))
stop(392,hsl(110,80%,20%))
stop(785,hsl(120,70%,20%))
stop(1100,hsl(100,0%,50%))
stop(1370,white);
}
.contour[zoom >=13] {
line-smooth:1.0;
line-width:0.75;
line-color:hsla(100,30%,50%,20%);
[zoom = 13] {
line-width:0.5;
line-color:hsla(100,30%,50%,15%);
}

[zoom >= 16],
[elev =~ “.*00”] {
l/text-face-name:’Roboto Condensed Light’;
l/text-size:8;
l/text-name:'[elev]’;
[elev =~ “.*00”] { line-color:hsla(100,30%,50%,40%); }
[zoom >= 16] { l/text-size: 10; }
l/text-fill:gray;
l/text-placement:line;
}
}

And finally a gratuitous shot of Mt Feathertop, showing the major approaches and the two huts: MUMC Hut to the north and Federation Hut further south. Terrain is awesome!
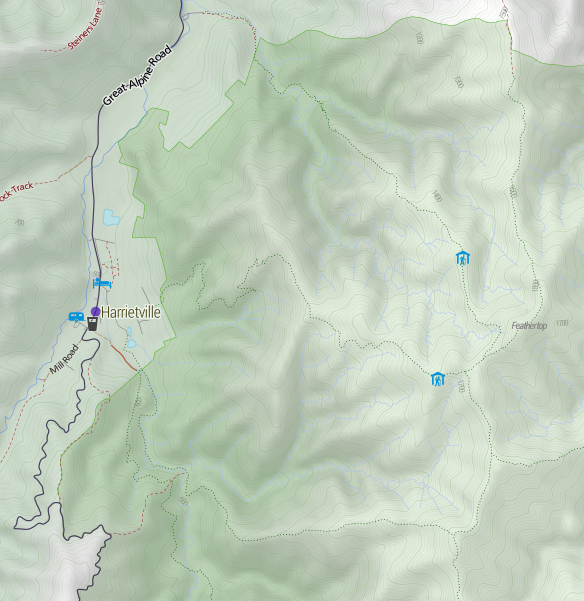
Screen shot 2013-09-11 at 11.25.23 PM

A TileMill server with all the trimmings

Recently, I set up a server for a series of #datahack workshops. We used TileMill to make creative maps with OpenStreetMap and other available data.

The major pieces required are:

  • TileMill, which comes with its own installer, and is totally self-sufficient: web application server, Mapnik, etc.
  • Postgres, the database which will hold the OSM data
  • PostGIS, the extension which allow Postgres to do that
  • Nginx, a reverse proxy, so we can have some basic security (TileMill comes with none)
  • OSM2PGSQL, a tool for loading OSM data into PostGIS

I’ve captured all those bits, and their configuration in this script. You’ll probably want to change the password – search for “htpasswd”.

The script below is out of date, contains errors, and is not maintained. Go to:

http://github.com/stevage/saltymill

# This script installs TileMill, PostGIS, nginx, and does some basic configuration.
# The set up it creates has basic security: port 20009 can only be accessed through port 80, which has password auth.

# The Postgres database tuning assumes 32 Gb RAM.

# Author: Steve Bennett

wget https://github.com/downloads/mapbox/tilemill/install-tilemill.tar.gz
tar -xzvf install-tilemill.tar.gz

sudo apt-get install -y policykit-1

#As per https://github.com/gravitystorm/openstreetmap-carto

sudo bash install-tilemill.sh

#And hence here: http://www.postgis.org/documentation/manual-2.0/postgis_installation.html
#? 
sudo apt-get install -y postgresql libpq-dev postgis

# Install OSM2pgsql

sudo apt-get install -y software-properties-common git unzip
sudo add-apt-repository ppa:kakrueger/openstreetmap
sudo apt-get update
sudo apt-get install -y osm2pgsql

#(leave all defaults)

#Install TileMill

sudo add-apt-repository ppa:developmentseed/mapbox
sudo apt-get update

sudo apt-get install -y tilemill

# less /etc/tilemill/tilemill.config
# Verify that server: true

sudo start tilemill

# To tunnel to the machine, if needed:
# ssh -CA nectar-maps -L 21009:localhost:20009 -L 21008:localhost:20008
# Then access it at localhost:21009

# Configure Postgres

echo "CREATE ROLE ubuntu WITH LOGIN CREATEDB UNENCRYPTED PASSWORD 'ubuntu'" | sudo -su postgres psql
# sudo -su postgres bash -c 'createuser -d -a -P ubuntu'

#(password 'ubuntu') (blank doesn't work well...)

# === Unsecuring TileMill

export IP=`curl http://ifconfig.me`

cat > tilemill.config <<FOF
{
  "files": "/usr/share/mapbox",
  "coreUrl": "$IP:20009",
  "tileUrl": "$IP:20008",
  "listenHost": "0.0.0.0",
  "server": true
}
FOF
sudo cp tilemill.config /etc/tilemill/tilemill.config

# ======== Postgres performance tuning
sudo bash
cat >> /etc/postgresql/9.1/main/postgresql.conf <<FOF
# Steve's settings
shared_buffers = 8GB
autovaccuum = on
effective_cache_size = 8GB
work_mem = 128MB
maintenance_work_mem = 64MB
wal_buffers = 1MB

FOF
exit

# ==== Automatic start 
cat > rc.local <<FOF
#!/bin/sh -e
sysctl -w kernel.shmmax=8000000000
service postgresql start
start tilemill
service nginx start
exit 0
FOF

sudo cp rc.local /etc/rc.local

# === Securing with nginx
sudo apt-get -y install nginx

cd /etc/nginx
sudo bash
printf "maps:$(openssl passwd -crypt 'incorrect cow cell pin')\n" >> htpasswd
chown root:www-data htpasswd
chmod 640 htpasswd
exit

cat > sites-enabled-default <<FOF

server {
   listen 80;
   server_name localhost;
   location / {
        proxy_set_header Host \$http_host;
        proxy_pass http://127.0.0.1:20009;
        auth_basic "Restricted";
        auth_basic_user_file htpasswd;
    }
}

server {
   listen $IP:20008;
   server_name localhost;
   location / {
        proxy_set_header Host $http_host;
        proxy_pass http://127.0.0.1:20008;
        auth_basic "Restricted";
        auth_basic_user_file htpasswd;
    }
}

FOF

sudo cp sites-enabled-default /etc/nginx/sites-enabled/default
sudo service nginx restart

echo "Australia/Melbourne" | sudo tee /etc/timezone
sudo dpkg-reconfigure --frontend noninteractive tzdata